Control Joint in Concrete: What They Are and Why to Use Them


A control joint is a deliberate gap or groove in a concrete structure that is designed to control the cracking caused by the natural cracking and shrinkage of concrete. Builders strategically place these control joints in concrete walls, slabs, and other applications to help control where the concrete will crack. This helps to minimize the random occurrence of these cracks and produce a more sound structure.
How Does a Control Joint Control Cracking in Concrete?
The creation of control joints, also called contraction joints, is a way that engineers restrain the forces that result from the drying and resulting natural movement in concrete. By using control joints, an engineer can transfer the load across the control joints by the interlocking of aggregates at the crack faces at the joints. Control joints also transfer the load through the use of keyways or dowel bars. Dowel rods are particularly useful on floors that carry heavy loads on a constant basis.
Forming Control Joints
Builders create control joints using three methods: saw-cutting, tooling, or using plastic strips.
Saw Cutting
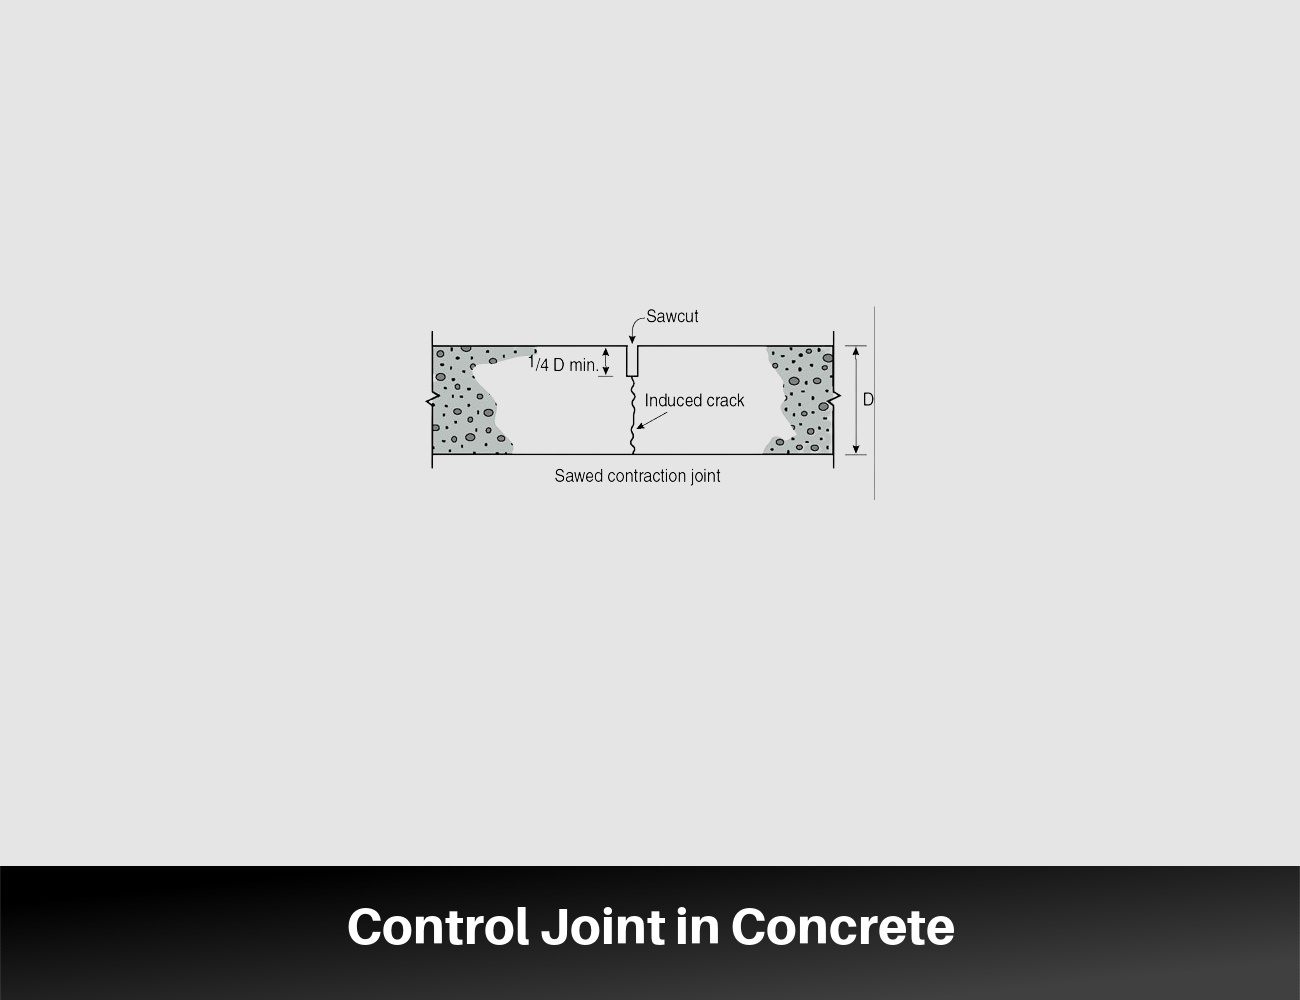
Saw cutting is the most popular and cost-effective way to form control joints. For this method, builders use a specialized saw, fitted with a diamond blade, to create straight intentional cuts in the concrete surface. They must use correct timing for these cuts and ensure that the concrete has reached a sufficient level of hardness so that it does not tear or damage after the cut. Many professionals make trial cuts and observe the results. If the aggregate does not come loose after the cutting, the concrete is ready to be cut. In general, this takes place 6-24 hours after they have poured the concrete.
Tooling
Tooling to create a control joint involves specialized tools to create an indentation in the concrete before it hardens. This is a less efficient and more costly way to form control joints, but it can be utilized on smaller concrete jobs or on jobs that are not suitable or practical for saw cutting.
The tools that builders use for this job are hand groovers, jointers, or trowels designed for making control joints. They apply pressure to the concrete using these tools to make a groove along a specified line creating a groove of specified depth.
Plastic Strips
Builders also use preformed plastic strips to form control joints. After the concrete has reached a sufficient dried state, they place the plastic strips into the concrete according to premarked locations. Once the concrete has cured and hardened, builders can remove the plastic strips which leave a void or gap in the concrete that acts as a control joint.
Factors That Determine the Spacing of Control Joints
Different applications require different control joint spacings. Builders use building code guidelines to help determine the correct spacing for a specific application. Even after they consider these guidelines, there are a number of other factors that influence the placement of control joints.
- Concrete Thickness – The thickness of a concrete structure is an essential consideration in control joint spacing. Thick slabs will require more control joints than thin slabs. As a general rule of thumb, the joint space should be spaced at 24-36 times the thickness of the concrete.
- Concrete Mix and Properties – The specific properties of different types of concrete can influence control joint spacing. This includes the type of aggregates, water-cement ratios, the addition of admixture, and curing methods as these will each impact the way that the concrete shrinks and expands as it dries. Concrete with a higher shrinkage will require more control joints.
- Environmental Conditions – The environmental conditions that surround the concrete will impact control joint spacing. Temperature fluctuations, humidity levels, sunlight exposure, or extreme weather conditions will influence concrete expansion and contraction. Areas with wide temperature fluctuations will require more control joints.
- Reinforcement Placement – The placement and type of reinforcements like steel mesh or rods can help to control expansion and contraction in concrete, but they do not dispense with any need for control joints. It is essential that when builders use concrete that has been reinforced with steel mesh, the mesh does not cross the joint as it will not allow sufficient movement between slabs.
- Structural Design and Loads – The design and use of concrete structures are vital factors in deciding the spacing of control joints. When concrete structures are subjected to heavy or dynamic loads, these must have sufficient control joints to help manage the stress and movement of the concrete.
- Aesthetic Considerations – The spacing of control joints impacts the way that concrete surfaces look. Closer control joints give the surface a busy look, while wider spacing complements a minimalist style.
Standard Control Joint Spacing by Application
Here are some general recommendations for control joint spacing according to specific applications. While these are a good starting place, it is best to consult a professional due to differences in concrete thickness, specific mix, and environmental conditions
- Interior Concrete Slabs – For interior concrete slabs for basement floors, garage floors, or warehouse floors, typical control joint placement is between 8-12 feet apart.
- Exterior Concrete Slabs – Due to more variable environmental exposure, exterior concrete slabs require closer control joint placement. For this type of application, control joints range between 4-8 feet apart.
- Concrete Walls – Concrete walls vary widely by height, thickness, and load capacity. In general, the control joint spacing for walls ranges between 16-24 feet apart.
- Concrete Driveways – Driveway applications vary widely in terms of size and projected load. Control joint placement for driveways has a typical range between 10-18 feet apart.
- Concrete Walkways – Concrete walkway joints vary between 4-6 feet apart.
Standard Control Joint Spacing by Concrete Thickness, Aggregate Size, and Slump
Here are general suggestions for control joint spacing according to concrete thickness, aggregate size, and concrete slump. As above, this spacing may vary according to design type and environmental conditions.
| Slab Thickness | Aggregates less than ¾ inch | Aggregates larger than ¾ inch | Slump less than 4 inches |
|---|---|---|---|
| 4 inches | 8-foot spacing | 10-foot spacing | 12-foot spacing |
| 5 inches | 10-foot spacing | 13-foot spacing | 15-foot spacing |
| 6 inches | 12-foot spacing | 15-foot spacing | 18-foot spacing |
| 7 inches | 14-foot spacing | 18-foot spacing | 21-foot spacing |
| 8 inches | 16-foot spacing | 20-foot spacing | 24-foot spacing |
| 9 inches | 18-foot spacing | 23-foot spacing | 27-foot spacing |
Difference Between Control Joint vs Expansion Joint
Control joints and expansion joints are both essential joints that builders use in concrete construction to perform different purposes. Builders create control joints to help minimize cracking due to the shrinkage that happens as the concrete dries.
Expansion joints, also called movement joints, are formed to control the expansion of concrete. Builders allow for the natural movement of concrete by filling the joint with compressible material like foam or rubber which can compress or expand without putting strain on concrete. Expansion joints are particularly useful in large concrete applications where builders expect thermal expansion in the concrete.